


DK: knitting advice archive
May 23, 2018
DEAR KNITTER: If I have a 5oz ball of fingering weight yarn and no ball band, how do I figure out the yardage? -- GOING THE DISTANCE
DEAR GOING THE DISTANCE: The first thing I would do, go onto Ravelry and search for a yarns that is fingering weight and in the same fiber as your mystery yarn. It is important to match the fiber, as fibers weight differently; alpaca, for instance, will be heavier than a merino which means you would have less yardage on an alpaca skein than a merino skein that weighs the same.
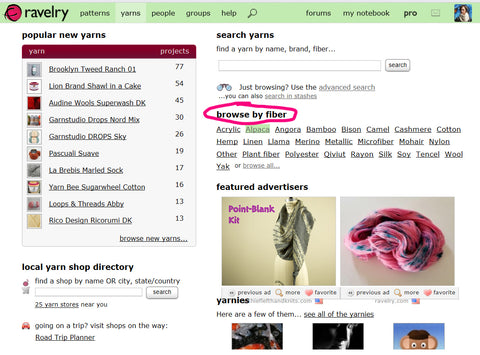
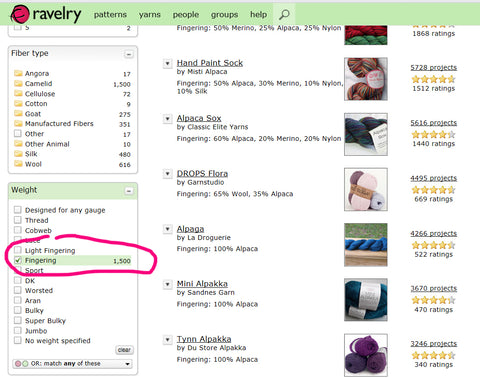
Note: on Ravelry, once you are in the yarns tab, I would browse by fiber and then by weight to find a match.
Once you found a similar yarn (fiber and gauge) follow these steps:
- Look at the how many yards there are per 50g on your sample ball (ex: 189 yards/50g)
- Convert 5oz to grams = 141.75g
- Divide 141.75 with 50g. 141.75 / 50 = 2.835
- Multiply the answer from step 3 by yardage on sample ball: 2.835 x 189 = 535.82
- The answer from step 4 is the approximate yardage your 5oz mystery skein has: 535.82 yards.
May 09, 2018
DEAR KNITTER: I am a super loose knitter, I have been taught not to pull the yarn because it can cause uneven stitches. How do I fix my tension? – TUG OF WAR
DEAR TUG OF WAR: The amazing thing about knitting, is there is no one way or a set “right” way to do it; everyone knits the way it is comfortable for them (next time you look around at other knitters knitting, check out how they hold the yarn and the motion their hands and arms move). The reason all patterns and yarn labels have gauges, is to allow knitters to accommodate their personal technique and tension to a universal pattern. So, if you are a loose knitter, chances are, you will have to go down a needle size to meet gauge; subsequently, if you are a tight knitter, you will probably have to go up a needle size or two.
I definitely agree with how you have been taught, extra pulling or tugging after knitting the stitch can cause uneven stitches, much like letting go of the yarn between stitches can also have this effect as well. The one place you may consider pulling the yarn a bit extra, to get your tension a bit tighter, would be during the motion of wrapping your stitch as you work it. If you have more tension from yarn ball to the yarn around the needle, you will naturally make a tighter stitch. Holding the yarn in the same tension as you come through the stitch is also important for tension control.
To prefect any skill, it takes time and practice. If you can stay in a fluid motion from holding your yarn to wrapping your stitches, you will be able to perfect your craft and control your stitch tension.
April 25, 2018
DEAR KNITTER: How do I calculate how long to make my tail when I do Long Tail Cast On? And, how do I measure how much yarn to leave for binding off? -- MEASURE UP
DEAR MEASURE UP: Great questions, here are a few tricks that can act as a guide for measuring.
- Long Tail Bind Off, tail length
- Starting at the very end of your yarn ball, wrap the yarn around your needle 10 times. This is essentially 10 sts worth. So, if you need to cast on say, 50 sts, you would take the length just figured out by wrapping your needle 10 times and use that length to measure 5 times on your yarn (see diagram).
- Note: if you are a tight knitter/cast on’er you might have a bit more tail left over, using this method. If you are a loose knitter/cast on’er, you might have less tail left over and should give yourself a bit extra, after measuring.
- If you have to cast on a ton of sts, over 200, I would suggest using another ball, or one of the ends of your yarn ball (if rolled into a cake), as your tail. This way, you will not run out of tail.
- To make it around or across your knitting, you basically need 3 times the width of your knitting, this is the width of the stitches that are on your needle at the time of bind off. Be generous with this measurement as we tend to be looser when binding off, which ultimately takes up a bit more yarn.
- My other trick to make sure I have enough yarn (and I only use this trick if I am at the very end of my yarn ball and trying to use every last morsel), is to tie a LOOSE knot at the half way mark of my final length of yarn. This way, if I don’t make it to the “knot” by the end of the row/round, I know I will not have enough yarn to bind off. Usually I keep checking where my “knot” is and know pretty quickly, before I get to the end of the row/round, if I will make it or not.

April 18, 2018
DEAR KNITTER: Is it better to slip the FIRST or LAST stitch, and is it purl-wise or knit-wise (if pattern does not specify). – SLIPPERY SLOPE
DEAR SLIPPERY SLOPE: If the pattern does not specify, the standard is always to slip p-wise. Keep in mind, slipping the first st can change the look and sometimes the way the knit drapes, if the pattern doesn’t instruct you to slip, I wouldn’t slip.
Slipping stitches on the edge: FIRST ST
- If you slip the first st of every row, you’re essentially creating an edge that has less rows than the body of your project. This can be good if you are knitting a flimsy sweater (thin yarn/big needles) and want a sturdier side seam. It can also look nice as an edging on a scarf, shawl or garment.
- If you are working in St-st or a patterned st, other than Garter: slip the first st p-wise if your second st is a p, and k-wise if your second st is a k.
- If you are slipping the first st on a Garter pattern: on both RS & WS, I would slip the first st p-wise, wyif and bring the yarn back, between the needles to work the next st.
Slipping stitches on the edge: LAST ST
- Slipping the last stitches creates an icord edging.
- Typically, patterns with this technique will have you slip the last 2 – 3 sts p-wise. Your yarn will then, not be at the “end” of the row. Working the stitches just slipped creates them to curl around the work.
- icord edging creates a very nice edging, it is a design detail the designer would intentionally add to their pattern instructions, if they want that look; it would never be assumed.
April 4, 2018
DEAR KNITTER: I am knitting with super dark yarn and it is staining my hands and needles!!! What should I do? – WHAT A MESS
DEAR WHAT A MESS: I am sure most knitters & crochetters can relate to this problem, if you like working with Indi and/or hand dyed yarns! Basically, the dye is bleeding and the PH & warmth from your hands are extracting the dyes from the yarn as you work with it. This mainly happens to yarns which are over-saturated or dark in color. The first thing you can do, is contact the yarn supplier or dyer directly, they might have had an issue with a dye lot and will exchange the yarns or have other solutions for you. This is not always the best resolution since you are most likely in the middle of a project!
The best advice I can give you, is to persevere through the project, washing your hands between sessions & lighter colors. Finish your project, and then soak your project in tepid water with white vinegar. I suggest about a ¼ - ½ cup per full sink of water; soak for about 20 minutes. Drain the vinegar water, squeeze out excess water (do not ring out) and refill your sink with tepid water and a Soak or Lanolin product for a second “conditioning” bath. If the vinegar smell is strong, you might consider a scented Soak/Lanolin solution. The vinegar sets the dye and will prevent any future bleeding (as you wear the garment or accessory).
As for your stained needles, I am sorry to say, they might stay stained for a while. Over time, the stain will come out (partially). You can try washing them, but if they are porous, most likely the stain has absorbed into the wood.
March 28, 2018
DEAR KNITTER: Whenever I put in a lifeline it bunches up as I knit the next row and somehow, I manage to knit it in to my row in a few places. Any tips to prevent that from happening? – RESCUE ME
DEAR RESCUE ME: Lifelines can be essential when knitting, if you want to prevent a ripping-out nightmare. It’s especially useful for intricate lace or between pattern repeats, this technique can save you a lot of headache. When I first learnt about lifelines, I was taught to thread a blunt tapestry needle and painstakingly thread through each stitch; this technique works (see “TIP” 2) but, if you can use LYKKE, Knitters Pride or ADDI interchangeable needles, I have a technique that will change your life!

For LYKKE & Knitter Pride (Dreamz, Karbons, bamboo) Interchangeables, the screw on cord will be the lifeline holder. There is a small hole in the metal part of the cord, where it screws in. This hole is the same hole you use to put the “key” into, to tighten your cord. Thread a piece of fine scrap yarn into the hole, longer than your actual piece you are knitting. Work your next row, and voila, your lifeline will be perfectly placed! On the following row, after the lifeline placement row, make sure to ONLY knit the stitch with the actual yarn, NOT the lifeline; take your time, the lifeline wont work properly if you knit it with the stitch.
If you have the ADDI Interchangeable sets, you can purchase SOS Lifeline Cords. These cords are made specifically for adding lifelines and have a small hole in the actual cord at the base of the “click” to thread a piece of scrap of yarn.
TIP:
- Try to add a lifeline on a plain Knit or Purl row, avoid YO’s if you can.
- If you have to use a tapestry needle and individually thread the lifeline through each stitch, use a blunt Using a blunt needle will help prevent stitch splitting as you thread the stitches.
- Use a thinner piece of yarn than your working yarn for your lifeline. If it is too thick, it could cause bunching.
- I am not familiar with other interchangeable needle sets, not listed above; but, what you are looking for is that small hold in the metal part of cord to thread a scrap piece of yarn into.
March 21, 2018
DEAR KNITTER: Whenever I drop stitches or have to rip my work out and place them back on the needle, my stitches become twisted. I also lose stitches sometimes… What am I doing wrong and are there any tricks for keep my stitches from unravelling? – TWISTED UNRAVELER
DEAR TWISTED UNRAVELER: This is more common than you might think! And I have some solutions. When ripping out work (a.k.a Frogging), and placing the stitches back onto the needle, start at the opposite end the yarn is attached (the last stitch you place back onto your needle will have the yarn attached). Hold the stitches in your LEFT hand, and using the right needle, pick up the stitches, going into each stitch BACK to FRONT. Going into the stitches back to front will place them onto the needle, untwisted. As for stitches unraveling, my trick is to “frog” back to one row before the last row you want to take out. On the last row, instead of ripping it back and having a bunch of live stitches at your mercy, one-by-one place the stitches onto the needle ripping back that last row as you go. This trick is also great, if you only have to go back one row or a partial row. To do this, hold the stitches in your RIGHT hand and using the left needle go into the stitch BELOW the stitch you want to remove on the right needle (before pulling the yarn out) FRONT to BACK. Once the stitch is secure on the left needle, pull the yarn/stitch off the right needle. Note: make sure your yarn, that is attached to the stitch you are removing, is either in back (knit stitch) or in front (purl stitch).
March 12, 2018
DEAR KNITTER: My pattern is for a cardigan being worked on circular needles. After casting on 195 stitches, it says: Do not join. On wrong side, work 53 left-front stitches. Place marker for left side. Knit 89 back stitches. Place marker for right side. Knit 53 right front stitches. I cannot make head or tail of this. What are back stitches? Are they going back over the knit stitches and unkntting them? If so, the why not just place the markers? Or should I join the two ends of the circular needles when kitting back? Or do back stitches mean knitting into the back? I’m flummoxed - please help! –B
DEAR B: When starting a top down sweater, whether it is worked fully in the round (pullover) or worked flat (cardigan), typically the pattern will start with working flat, building a bit more height at the “back” of the neck and length at the center front. In this case, when the pattern reads, “knit 89 back stitches” they are simply referring to the stitches that are literally the Back of the sweater; the L Front & R Front stitches also refer to specific sections on the sweater. You would Knit these stitches as noted. Keep in mind, circular needles can be used for knitting in the round and/or knitting flat (back-and-forth).

June 15, 2016
DEAR KNITTER: How do I know what length circular needle to choose? – LENGTH MATTERS
DEAR LENGTH MATTERS: The general rule for measuring circular needles is tip-to-tip (not the actual cord). There is always a slight variation to this rule depending if you are using short tips or long tips from an interchangeable needle set. The typical lengths (tip-to-tip) for circular needles are: 12”/30 cm; 16”/40 cm; 20”/50cm; 24”/60 cm; 32”/80cm; 40”/100 cm; 47”/120 cm; 60”/150cm.
If you are working in the round you must choose a needle/cord length that will fit all your sts without pulling tightly; typically hats are done on no longer than 16”/40 cm – 20”/50 cm. For smaller st count projects like hats or socks Magic Loop technique can also be used; because this technique requires pulling the cord out between the sts in two places the cord should be no shorter than 32”/80 cm. If you are not working in the round and working back and forth, the typical length is 24”/40 cm - 32”/80 cm. I am a “squisher” meaning I like a shorter cord (24”/40 cm is my favorite) no matter if I have 20 sts on my needle or 400 sts. Many knitters prefer not to squish their sts and knit in fear that their sts will fly off the needle ends and will work on 32”/80 – 60”/150 cm when working on shawls and projects with a lot of sts. Many patterns call for DPN’s while working sleeves or socks. My trick is to knit the sleeves and cuff/foot of socks on 12”/30 cm. This allows me to knit more seamless and not have to deal with any laddering between DPN’s that may occur.
Here is a quick project guide for choosing needle length:
- 12”/30 cm: sleeves; sock cuffs & feet; baby hats.
- 16”/40 cm: hats; any project in the round with 60 sts or more.
- 20”/50cm: hats; any project with 50 sts or more.
- 24”/60 cm: most projects worked flat; any project with 90 sts or more.
- 32”/80cm: Magic Loop; mainly used for projects working flat. Large st counts 200 or more.
- 40”/100 cm: Magic Loop; mainly used for projects working flat. Large st counts 400 or more.
- 47”/120 cm: Magic Loop; mainly used for projects working flat. Large st counts 600 or more.
- 60”/150cm: mainly used for projects working flat. Large st counts 6800 or more.
If you are looking to purchase circular needles or cords & tips, you can find them here.
June 08, 2016
DEAR KNITTER: Before starting a knitting pattern I always go to my stash to see if I have the exact yarn I need. I have a lot of yarn but often times the yarn is too thin for the projects. Is there a formula to figure out yarn gauge for doubling up strands? – DOUBLE TROUBLE.
DEAR DOUBLE TROUBLE: First of all I have to commend you for taking the dive into your stash to find yarn for your projects! Secondly, yes there is a formula for figuring out doubled yarn!
Multiply the yarn gauge (over 4”/10 cm) by 70% to get the new gauge. Here is an example using a DK weight yarn which is 22 sts per 4”/10 cm:
Holding the strands together your math would look like this: 22 x 70% = 15 st over 4”/10 cm (new gauge).
Holding 4 strands together (example, lace weight) your math would look like this: 32 x 70% = 22.4 (new gauge). Take your new gauge and do the math again: 22.4 x 70% = 15.5 (new gauge)
If you do not like to work in %’s then the math is as follows: 22 x 0.7 = 15 (new gauge)
It is important to consider how the yarn will look doubled. If you hold two strands together that are the same color and/or fiber it will look just like a thicker yarn; once knit up you will not notice the yarn was held double. If you use two different color yarns together you will get a marled or heathered look. I would say marled is created when the two yarns have more of a color contrast. Heathered would be created if the yarns were more similar and had less of a contrast.
Lastly, if the math isn’t working or you want to hold thick, thin or different textures together, the sure way of finding a gauge is to simply make a swatch!
May 18, 2016
DEAR KNITTER: I am knitting a pattern from a reputable knitting magazine and I seem to be stuck. I don’t know if it the pattern or me. Do you have any ideas how I can move forward with this pattern? – IS IT YOU OR IS IT ME?
DEAR IS IT YOU OR IS IT ME: I know you might be ready to break up with this pattern but there are a few resources you might consider before you cut your ties…or your yarn. As much as we love to trust patterns it is always good practice to check for errata’s before you begin…. If you are unfamiliar with the term ERRATA, it simply means an error in printing or writing; a list of corrections. Often when publishers or designers fix a mistake on a pattern they will post an errata for the section they changed on their website or on Ravelry. Searching before is not always possible; in your case, I would suggest logging onto Ravelry (if you are not a member I strongly propose you join). On Ravelry people post their works in progress and finished projects often with photos and comments; in the pattern section you can search for the specific pattern you are working on and then look at all the projects associated with that pattern. Read the notes: if everyone is posting how fabulous and easy the pattern is, then you know the problem is you. If people post about having difficulties/complications then you know the pattern is the problem. Sometimes on Ravelry there is a link to an erratum on the pattern details page.
Once you figure it out, if it’s you or the pattern, take the steps to get help. If it’s you and you don’t have a knitter friend to call upon, I suggest going to your LYS and ask for help or set up a lesson. If it was the pattern, getting the errata often is a sure way to get back on track! Typically there is always contact information on patterns purchased from independent designers. Contacting the publisher directly is also a great way to get some help or clarification on directions. Sending messages through Ravelry is another good way to get in touch with the designers to ask questions.
Here at the Crafty Jackalope we always take extra care to insure our patterns have no errors but alas, we are human and mistakes occasionally happen. You can go to our errata page for reference. All patterns come with the lasted updated versions; if you purchased any of our patterns from TCJ website or through Ravelry updated versions are always sent to you.
April 13, 2016
DEAR KNITTER: The knitting pattern I am casting on calls for 6 different size needles. (Thank goodness for interchangeables!) The gauge it calls for is 20 stitches using 4mm (6US) needles. But for the yarn I'm using, I had to go up to 4.5mm (7US) to get that gauge. So, does that mean I bump up the sizes of all of the other needles by 0.5 mm as well? All in all, the original pattern calls for 3.5, 4, 4.5, 5, 5.5 & 6 mm (4, 5, 7, 8, 9, & 10 US) needles. – NEEDLE SIZE MAYHEM
DEAR NEEDLE SIZE MAYHEM: You are absolutely right; if you did a swatch *pat on the back* using the needles & stitch pattern the pattern suggests and came to the conclusion to get proper gauge you need to go up in needle size, then you must also change the rest of your needle sizes accordingly. Meaning, your “4mm/ 6US” is now 4.5mm/7US, so your needle size range will now be: 4, 4.5, 5, 5.5, 6, 6.5mm (6, 7, 8, 9, 10 & 10.5US).
March 30, 2016
DEAR KNITTER: I am on the last few rows of finishing a baby blanket. What is the best way to weave in the ends. Also I have some joins that need to be dealt with in the middle of the blanket when I started a new skein. Thank you. –WEAVING IN ENDS
DEAR WEAVING IN ENDS: Finishing is one of the most important steps, other than blocking to making a blanket, accessory or garment look professional. All knit or crochet projects has at least one or two maybe multiple ends to weave in. Here are some tips:
1) While knitting think about the best place to hide ends when switching/adding yarn skeins. Typically, I would not switch in the middle of the row; either the ends or right after a border sequence is the best place. I would rather waste some yarn to start a new ball on an end then have to weave in mid row/round.
- If you are not sure you have enough yarn to make it across a row/round, fold the yarn you have left in half and make a slip knot: If you make it past the slip knot on the next row/round you won’t have enough for one more round; if you are close to the knot but did not past it, you will have enough for one more round.
- Typically, the amount of yarn needed to complete a row/round is 3 times the length of the row/round.
- When working in the round, I tend to switch/add my yarn on the side if it is a garment and on the center back if it is a hat or cowl
- If your yarn is thin enough (I would not recommend this technique for chunky or bulky yarn): work your old end in with the new yarn end for the first row/round and on the second row/round work the tail of the new yarn with the working yarn; essentially you will be working with two strands at the same time for the tail lengths - no more than 3.”
2) Spit & Splice: This is a great technique, especially if you have to join yarn in the center of a row/round.
- Untwist two plies of the new yarn and two plies of the tail end about 2” – 3” long each (You can break one of the plies from each end if you want a less bulky join)
- Lay the two ends with split plies overlapping end to end in your hand and spit on them (use water or tea if you don’t like the traditional method of spit)
- Rub your hands together with the yarn in between. The motion of the yarn spinning between your hands combined with the spit should felt and “re-spin” the fibers together creating a secure bond.
3) When weaving in ends at the end of a project I always use a sharp point tapestry needle. I choose a sharp point over a blunt point so I can split the fibers as I weave in. For a bulky or sometimes a chunky yarn, if I can, I split the plies in half and weave in the two split ends separately; the result is a bit less bulky. You don’t need to weave in more than an inch space length and no more than three passes. If you have ever had to take out work after weaving in ends, you will understand how secure weaving in ends can be!
4) Duplicate stitch: weave in the ends following the stitch pattern.
Lastly, my final tips:
-
It is important to consider the fiber content when choosing the right method for weaving in ends. For instance, Spit & Splice will not work for acrylic yarn, nor for 100% cottons or linens. Spit & Splice works because the fibers are latching onto each other and felting somewhat.
-
Natural fibers that are hairy will need less weaving in than a smooth fiber like cotton, linen, hemp, etc.
-
When weaving in always work on the wrong side of your work, continually checking the good side to make sure you are being as seamless as possible.
-
When weaving your tapestry needle through the fibers, before passing through, check the good side of the fabric; where you see your tapestry needle peeking through, you will see your yarn.
-
If you are working on a project with a lot of ends to weave in (multiple color changes), my advice is to weave in as you go. There is nothing worse than finishing a project and having to weave in a gazillion ends!!
-
If you are working on a project where there is seaming involved (like a granny square blanket or a sweater), keep your ends long, you can use them to sew up the seams in the end!
March 16, 2016
DEAR KNITTER: I usually have partial skeins of yarn leftover from my projects; I can’t bear to throw them out. Should I bother keeping them? If so, what is a good way to organize them so they don’t become a tangled mess and what can I use these ends for? – ODDS & ENDS
DEAR ODDS & ENDS: Although, it is always better to have too much yarn left over rather than running out mid project, it does pose an interesting predicament: do I have enough leftover to save? Is it nice enough to save? Do I like the color? What will I make with it? I typically save most of my ends that are 1 yard/0.90 meters or longer. Here are some ideas:
- SMALL AMOUNTS: If you make a lot of dolls or animals, small bits are great for the details like faces, hair, bows, etc. If you are making projects like Tiny Owl Knits Beekeepers Quilt and are embellishing them with Duplicate Stitch small bits are handy. If you like the idea of having yarn to mend projects you have made, smaller bits are perfect! The best way to organize these smaller bits is to consider keeping them balled up in Tupperware, or a cardboard or tin box; separate from the bigger yarn leftovers. Another idea: cut out pieces of cardboard about 2.5”/6.25 cm x 7”/17.75cm and wrap the yarn around on the cards.

Or use a hole punch and create holes to tie the yarn through.

It can be useful to label cardboard beside the yarn with the yarn details for future reference.
- BIG AMOUNTS: Any yarn that is bigger than about 25 yards/23 meters in length I consider as “big amounts.” If you knit a lot, these can certain rack up quickly. When my stash of odds & ends grew bigger than a bin, I quickly realized that I needed to get organized. When they were all together I was constantly re-balling them, untangling them and I never knew what colors or yarn weights I had. Organizing them allowed for quick and easy access; anytime I needed a color, scrap yarn for stitch holders or for Provisional Cast On, or I wanted to create something or follow a pattern that called for odds a& ends, they were at arm’s length and ready to work with. To organize, I purchased 14 clear plastic shoe box bins from Home Depot for about $0.97 each. You can start with as many or as little bins as you need; I started with 14, but added about 4 more as my colors/weights/bits grew. I labeled each bin by color (grey, dark grey, blue). For the colors with the most odds & ends, I separated those again by yarn weight (chunky cream & fine cream). For the colors I had the least amounts of I put them together in shared bins (red & yellow; purple & navy). How you choose to label your bins and organize your bits is entirely up to you. If you prefer to sort them by weight, by fiber, by yarn brand name then by all means go nuts!

Now that you have organized your odds & ends, it is time to use them! There are some really great projects out there specifically designed to use them up. If you feel like designing or just knitting/crocheting freely then I would say Cast On and have fun with stripes, fringe, and circles. Play around with color and texture; don’t be afraid to mix weights and fibers!
Here are some great projects for odds & ends (other than the projects I mentioned above):

Heartfelt Rings by Tiny Owl Knits

Leftovers Cowl by Wendy D. Johnson


March 09, 2016
DEAR KNITTER: I rarely block. Don't get the concept. If it's a washable item, aren't we back to Square One? UNCONVINCED BLOCKER.
DEAR UNCONVINCED BLOCKER: Blocking, in most cases is an essential part of finishing a garment or an accessory; it is definitely a necessity for any lace. It sets and evens out the stitches and seams; it opens up the lace stitches and transforms your knitting from amateur to professional in almost an instant (minus drying time if you wet block).
There are two types of blocking: wet blocking and steam blocking. I use both methods equally and for different reasons. I also sometimes combine both methods.
- WET BLOCKING: is the best method for blocking lace and shaping sweaters/accessories to measurements. For lace it opens up the stitches revealing the lace patterns and stitches in the most spectacular way. For sweaters, it is a great way to set your stitches and block to specific measurements before seaming a sweater together. To wet block, simply fill the sink, tub, bin, basin with tepid (lukewarm, cool) water and about a cap full of a wool wash (I use Eucalan or Soak which is a NO RINSE cleanser and a conditioner). Once the sink is full and bubbly from the wool wash, fully submerge your work until it is totally saturated in the water. Leave soaking for at least 15 minutes or more. After soaking time, unplug the sink, tub or basin and let the water fully drain. With products like Eucalan or Soak you will not need to rinse! DO NOT wring (twist) your work; a wet garment can stretch out of shape easily. Gently squeeze out the water and place garment or accessory flat on a big towel and roll it up like a burrito. You can delicately step on it or just let it sit for 5 -10 minutes to further remove any excess water. The wetter the piece the more you can block. Sometimes, for lace blocking, keeping the shawl fully saturated will allow you to open up the lace stitches more and block to a bigger size. I rarely keep my fabric fully saturated; the drying time is often too long. The next step is to lay your garment or accessory flat on blocking boards to dry. If you are blocking lace or any piece that requires shaping (the pattern will often show a schematic with measurements to follow) you will need to use blocking wires. The wires are fed into the edges of the work and held by T-pins. This is essential when stretching fabric; the wires keep the edges from forming scallops from where the T-pins are placed and keep the edges straight. Once the wires are in, and then let the piece fully dry. If there is no shaping involved, just simply place your garment or accessory neatly on the blocking boards and let it dry flat.
- STEAM BLOCKING: This is a great method of blocking, there is no drying time and it is a quick process. I do not use this method for lace or for sweaters where I have to block each piece to measurements before seaming. I use this method a lot on sweaters where there is minimal shaping needed and a lot on accessories (again, where there is minimal shaping required). You will need a good iron that has a steam function. Place the finished garment on blocking boards; you can use blocking wires and T-pins just like in the wet blocking if you need to hold piece in shape. Set your iron to hot and set to steam. The key to Steam Blocking is NOT to touch the iron to the actual knitted piece! You will essentially be hovering the iron, blasting steam into the fibers. Once you blast one side with steam, let cool. Turnover and repeat on the other side: again blasting it with steam and then letting it cool.
- COMBO {WET & STEAM}: You can combine the two methods. I often combine when there are multiple steps to finishing, often seen in sweaters: wet block each piece to measurement (fronts, back & sleeves); then sew the side seams, arms and set in armholes; then knit the neck collar and front bands; then steam block the seams and additional knitted portions. TIP: make a spray bottle filled with a solution of water and a small amount of Eucalan or Soak; this is good if you want the benefits of the conditioning product when Steam Blocking.
If you are unsure of which method to use, I highly recommend doing a SWATCH TEST. Knit two squares in pattern and wet block one and steam block the other. You will notice different fibers & stitches benefit differently from each blocking technique.
Lastly, to address your question about blocking once and then having to block AGAIN or EVERYTIME after washing the answer is: yes, you will have to re block every time you get your garment/accessory wet, but it is worth it. Personally, I never machine wash my knitted pieces even if I use a superwash yarn. I feel like I spent so much time creating this garment or accessory it deserves hand washing. Therefore I would essentially “Wet Block” again to wash. I might lay flat to dry opposed to using the wires and T-pins (unless it was a lace shawl), and I might steam into shape once dry. I think it is worth taking the extra steps to make your creativity shine!
March 02, 2016
DEAR KNITTER: when I first caught the knitting bug, I bought A LOT of yarn. But I wasn’t buying yarn for specific projects, just ones I’d see in my LYS that caught my eye. Consequently, I have one or two skeins of a lot of beautiful yarns, but have no idea what to make with them. What’s the best way to find patterns to make with yarn you already have? — SEARCHING FOR PROJECTS
DEAR SEARCHING FOR PROJECTS: I can totally relate…I think a lot of people can totally relate! As knitters and crafters, it is absolutely normal to collect tools, supplies and yarns for your craft. To be drawn to yarns and to surround yourself with yarn that inspires you is going to be a natural thing you do. That being said, it is always satisfying knitting and crafting with your stash; using up what you have to make room for more new and exciting yarn! The best and easiest place I start, when looking for patterns to go with the yarn I stashed, is Ravelry. There are two great ways to tackle your search for finding projects to go with certain yarn weights and specific yardage.
- 1) On Ravelry: at the top menu, search by “YARN.” Search for the specific yarn you have either by yarn name or by company, I searched “TOSH DK.”

If you click the yarn name, you will be lead to all the info about that yarn. If you click to the right of the image, you will be lead to all the projects people have made.

Once you click on the projects you can do a further search by project type like sweaters, cowls, headbands, hats, mitts, kids, etc. You can also read other peoples project notes to get info on patterns and yardage used
- 2) On Ravelry: at the top menu search by “PATTERNS.” Under PATTERNS, I searched “COWLS.” If you have only a small amount of yarn like one or two skeins, search for smaller projects like: cowls, shawls, hats, headbands, mittens, fingerless gloves, baby sweater…etc. If you have more than three or four skeins, search bigger projects like: sweaters, capes, shawls, legwarmers, shrug, vest…etc.

Once you are in the “COWLS” category, or whatever you chose to search for, take advantage of the side searches; they are amazing! You can choose what type of project, knitting or crochet, if it has an image, by yardage, by yarn weight, by needle size, by technique, etc.

Once I find a project I like, I always add it to my queue.

Everyone has their own preference, I prefer queuing it up because it allows me to add my yarn I am thinking of using to it any notes I may have along with who I am knitting it for. I also like the convenience of all my favorite patterns in one place ready to “start project” and keep track of my progress in my PROJECTS in my NOTEBOOK section.

By the sounds of it, your days of purchasing yarn ‘just because’ without purpose are far from in between, but let’s be honest, we all have our weaknesses! I always think, half of being a knitter, is collecting yarn; for me, it is part of the process. Perhaps these days I tend to make my purchases more meaningful, but there are always those stray beautiful treasures that sneak in or I change my mind and need to find a new purpose for the yarn I thought had a plan. Ravelry is the first place I always go to for pattern inspiration, it is a great reference and I have no doubts that you will be able to find the perfect pattern to go with your beautiful stashed yarn!
February 24, 2016
DEAR KNITTER: How do you count rows? – ROW COUNTER
DEAR ROW COUNTER: Because there are so many stitches out there, I am going to focus on the basics: Garter Stitch & Stockinette Stitch. Understanding what is happening while you knit or purl can help you recognize the rows more easily.
- Garter stitch
- Garter stitch worked flat {knitting all rows} creates ridges on both sides of the fabric. When you knit a row on the right side you are creating a ridge on the wrong side; when you knit a row on the wrong side you are creating a ridge on the right side. To count these rows you must count a ridge as one row and the row between the ridges as another row.
- Garter stitch in the round {knit one round, purl one round} creates the exact same look as working garter stitch flat. When you knit in the round on the right side you create a ridge on the wrong side; when you purl in the round on the right side you create a ridge on the right side. The procedure for counting the rows/rounds is exactly the same as counting the rows flat.
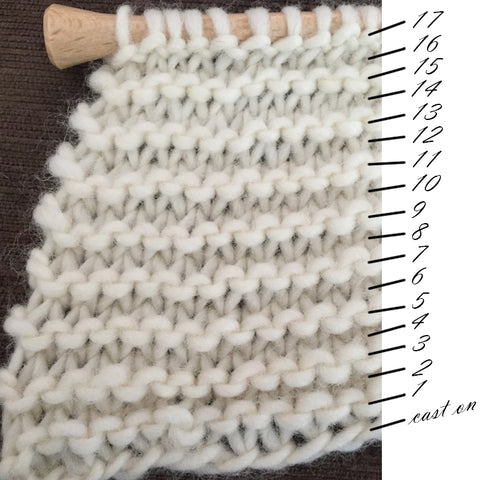
- Stockinette Stitch (St-st)
- St-st worked flat {knitting on the right side & purling on the wrong side} creates flat “v” like stitches on the right side and ridges on the wrong side. You can either count rows on the right side or the wrong side. When you knit on the right side, you create ridges on the wrong side; when you purl on the wrong side you create ridges on the wrong side. To count on the right side, count each V; to count on the wrong side, count each ridge.
- St-st worked in the round {knitting all rounds} creates the exact same look as working St-st stitch flat. When you knit in the round on the right side you create a ridge on the wrong side. The procedure for counting the rounds is exactly the same as counting rows flat.


- Helpful tips
- For easy counting, add removable stitch markers on the first or last stitch of every 5th or 10th row as you work. This is a good way to keep track of your rows if you have a lot to keep track of or if you don’t have a row counter.
- When following a multi row/round chart or pattern it is a good idea to add lifelines every repeat if you are feeling less confident or less often if you feel sure. Lifelines can seriously be a lifesaver. There are two ways to add a life line:
- take a scrap piece of contrasting yarn (this will be your lifeline) close to the same yarn weight as the yarn you are working with and while the stitches are on the needle thread the lifeline using a blunt tapestry needle through the stitches keeping the stitches on the needle. Make a note to which row/round in the pattern you place your lifeline. After, if you make a mistake on a row/round and need to rip {frog} a row/round you can easy rip back to the lifeline without worrying about losing stitches or row counts and you will know exactly which row/round you are on. It is important to use a blunt tapestry needle to thread your lifeline through your stitches so you don’t split the stitches.
- Addi invented a cord that has a little “eye” built in, like an eye of a tapestry needle. Threading a piece of scrap yarn {which will be your lifeline} through the eye and then working a row/round will automatically thread your lifeline into your stitches. This will save you a bit of time over manually threading in the lifeline. These Addi lace cords come in the pink lace interchangeable lace set but the individual cords are sold separately and can attach to any of the Addi interchangeable sets.

February 03, 2016
DEAR KNITTER: I am confused sometimes on which increase to choose and I often forget how to do them and I am not sure why it’s sometimes M1L or M1R, versus K1fb or knit in the stitch below. Please advise. – INCREASE INQUIRER
DEAR INCREASE INQUIRER: It can be confusing and there are many increases and decreases out there to choose from. A lot of designers will include their preference for increasing in the pattern and hopefully include a brief description of the technique preferred in the notes and/or abbreviations. Some designers do not include this which leaves you, the knitter, to choose. Here is a bit of a breakdown of the most common increases:
- M1L {make one left}: this increase is done in the bar between two stitches. The bar is picked up {front to back} with your LHN to create a new stitch which is then knit in the back loop. This stitch slants left, which is why it is called make one LEFT.
- M1R {make one right}: is very much like the M1L increase; however, you pick up the stitch in the bar between two stitches {back to front} and knit into the stitch normally which creates the new stitch slanting to the RIGHT.
- NOTE: M1L & M1R do NOT use an existing stitch to be created. Example: if you have 10 stitches and you want to M1L or M1R, it could read like this: K2, m1L, k6, m1R, k2 (12). You can see that K2 + k6 + k2 = 10 stitches and the M1 stitches were added in between existing stitch count.
- It is also important to note, that if you do not make that new stitch, created by the bar, TWIST as you knit into the back loop (M1L) or normally (M1R) , you will create holes where you increase (this could be an intentional design element if you wish, but no good if you don’t want them). This rule applies to both M1L & M1R.
- M1L & M1R are pretty seamless increases. If you are trying to increase without showing it, this is a great option.
- K1fb {knit one front and back}: Using an existing stitch, knit into the front (normal), keep the stitch just knit on the LHN, and knit into it again through the back loop, remove the stitch off the LHN.
- It is important to note that this increase uses a stitch. So unlike M1L/M1R, K1fb must be included in the original stitch count. Example: if you have 10 stitches and you are increasing using K1fb it would read like this: K2, k1fb, k4, k1fb, k2 (12). You will notice that k2 + k4 + k2 = 8 which means the K1fb use one st (k2 + 1(k1fb) + k4 + 1 (k1fb) + k2 = 12
- This increase leaves a little purl bump. If you want the decorative bump to show or are working in garter stitch, this is a great option.
- Lifted increase or knitting into the stitch below is a similar increase to M1L/M1R and does not use a stitch. There is a left and a right:
- RIGHT: Lift the right side of the stitch below the first stitch on the LHN, onto the LHN and knit it, then knit the stitch.
- LEFT: slip the next stitch from the LHN to the RHN, lift the left side of the stitch below the slipped stitch and place it on the LHN, slip the stitch back onto the LHN, knit the 2 next stiches.
- This increase is also fairly seamless and won’t show as much as K1fb. It is a bit more seamless than M1L & M1R where the leaning stitch can be slightly more obvious.
- YO {yarn over}: This this increase makes a hole. It is a decorative increase and is often found in lace knitting or where the designer intentionally wanted an open look or uses it as a design element. Here are some techniques to create YO increases:
- If you are knitting between YO’s: bring your yarn forward (back to front) through the middle of your needles and knit the next stitch wrapping the yarn around the RHN as you knit creating an extra stitch.
- If you just finished a knit and need to purl right after a YO: bring your yarn forward (back to front) through the middle of your needles, then wrap the yarn around the RHN and bring it back between the middle of your needles again, purl the next stitch.
- If you are purling between YO’s: bring the yarn around the RHN to the back and then bring the yarn forward between the needles (wrapping the RHN), purl the next stitch.
- If you just finished a purl and need to knit right after a YO: keep your yarn in the front and knit bringing your yarn around the RHN to the back creating an extra stitch.
January 27, 2016
DEAR KNITTER: I work for a crappy company and I am thinking of quitting my job. But I'm also worried about how this move will affect my yarn budget. What do I do? – NO MORE CASHMERE?
DEAR NO MORE CASHMERE? We all make sacrifices in our day-to-day and what keeps you sane in your crappy job is probably the fact that you knit with cashmere! I kid, while cashmere is beautiful to work with, it’s really just the fact that you knit and craft with yarn that is keeping you sane; that being said, everyone has a breaking point. Whether it a forced quit or you decide to quit, insecurities of the unknown are looming and you are most likely taking a serious look at your expenses (yarn included). My favorite line, for those who feel like their yarn budget is too high, or they feel particularly guilty about a ‘too’ big or luxurious yarn purchase is: “yarn is cheaper than therapy….” (In most cases)…. My advice for you is this:
- ORGANIZE: before you make a new/realistic budget for you and your family, take apart your yarn stash (I know you have one). Organize it, go through all your yarns and re-fall in love with the yarn you already have! Go on ravelry, start saving projects or dream up designs that will work for the yarn you have. Making a budget with the secure knowledge that you have hours of potential knitting time now nicely organized will make, making a “yarn budget” easier.
- BE SPECIFIC: It is one thing to make a budget, there is another sticking to it. If you see yarn that you absolutely love, before you make the purchase think of exactly what you will make with it (subject to change). Try not to purchase yarn (for a while) that you just “have to have” but have no idea what you will make with it. Avoiding these rash purchases will prevent over or under yardage buying and buyer’s remorse.
- TAKE A PHOTO & WALK AWAY: This is a great practice for anything. If you see something (yarn in particular) that you LOVE…take a photo of it & walk away…like, leave the shop or get off the website. Wait 24 hours, think about what you will make, revisit the yarn photo and you will know if the purchase is a must or a bust.
- THRIFT STORE YARN: often times thrift stores are a great place to find yarn treasures. If there are only crappy single balls for sale then look at the ready-made sweaters for texture and color. If you see a sweater you love: buy it, wash it, unravel it, re-ball it & knit with it!
- YES TO CASHMERE: we must not forget the healing properties of knitting, crochet & crafting. To me, I find great joy in the feel of luxurious (namely cashmere) and other quality fibers. Knitting would not be as enjoyable if I used a crunchy acrylic. It is so important to maintain your quality knitting experience, whatever that is for you. Purchase less; find the sales and discounts to keep your yarn quality the same.
- TEMPORARY: lastly, change is hard, scary and uncertain. Sometimes taking the jump to find a new job or work place is worth the uncomfortable leap. We are at work the majority of our days, and it is important to be happy there! Your situation is temporary; when one door closes another door opens. Keep those needles click’itty-clacking during this stressful time!
January 20, 2016
DEAR KNITTER: What is the best advice to substitute yarn in patterns? –YARN SUBSTITUTER
DEAR YARN SUBSTITUTER: It can be hard to always get the yarns the designers intended for their patterns and there can be many reasons why substituting is necessary: LYS doesn’t carry the yarn; the yarn is discontinued; you might have sensitivity to the fibers; you are looking for a cheaper or more luxurious swap. Here are some helpful tips on making the process a bit easier:
- FIBER: The first thing I look up is what the original yarn was made of; I look at the fiber. Was it 100% wool (less drape, holds shape, good memory, can be felted)? Was it cotton, linen or hemp (stiff, less drape, cool in the summer, less memory, stretches out if shape)? Was it an alpaca (heavy fiber, hot, lots of drape, sheds, not much memory)? Was it a bamboo (slinky, lots of drape, not much memory)? Was it acrylic (crunchy, hard to block, can’t be felted)? Different fibers act in different ways. When designing a garment, accessory or home décor, most designers take into account all of these things: how the fiber wears; how it drapes; how the fibers feel: soft, stiff, scratchy; are the fibers feltable? When substituting, I look at either using the same fiber or something close to it. If I make the decision to change the fiber completely, understanding the characteristics of the fibers helps enormously.
- GAUGE: Look at the original ball band on the yarn (search the yarn on Ravelry if the ball band isn’t accessible). The gauge info is typically written out or shown as a small grid. Looking at needle size is also a helpful indicator of gauge. It should say numbers like: 20 or 22 or 18 per inch or over 4”(10 cm). These numbers indicate the gauge of the yarn. I have added a standard yarn gauge guide here in the knitting 911 section. Substitute yarn that matches what the original yarn ball band says. Please note: sometimes the pattern has a different gauge than the ball band. I never follow the pattern for gauge when choosing my alternative yarn; I always use the original yarn ball band as a guide. I do this because the designer’s gauge could be different from the yarn or they could have intentionally changed the gauge in the pattern using a larger or smaller knitting needle size.
- QUANTITY: Look at the ball band for yardage or meters. I NEVER go by weight because different fibers weight different. You really want to make sure you get the right yardage or meters, nothing is worse than running out of yarn before the project is finished! Here is the formula: (original yards/meters per ball) x (number of balls needed) = (total yards/meters) / (new ball of yarn yards/meters) = (total number of balls needed of new yarn). Example: 100 yards x 5 balls = 500 yards / 50 yards of new ball = 10 balls of new yarn.
- DOUBLING YARN: If you want to double the yarn (hold two strands together) here is the math for that: gauge of yarn x 70% = doubled yarn gauge. Example: 18st (worsted) gauge x 70 % = 12-13 st gauge (chunky).
January 11, 2016
DEAR KNITTER: I struggle to follow patterns, or I should say I'll piece together bits and pieces from 2 or 3 different patterns (number of cast on stitches, needle size & yarn weight from one pattern, fancy stitch from another pattern, shaping & size from another pattern), and then basically just wing it and hope for the best. Sometimes it turns out, sometimes it doesn't. Any advice on how to piece together patterns in more structured and planned way? -- FREE SPIRIT
DEAR FREE SPIRIT: First of all I have to commend you for being a free spirit knitter. I love that you “just wing it” at times and take chances. In a sense you are designing; being inspired by a shape, shaping, stitches and bringing them together creating a “new” look! Here are a few tips you might consider when mix and matching for a higher turnout rate:
- SWATCH: If you follow me on twitter, FB or Instagram you will notice I am not the world’s greatest swatcher, I sometimes take chances too and just dive in, but the chances of knits not working out become higher. In your case, especially if you are using multiple patterns with different stitches and yarn weights, swatching will be your friend. Swatch using the main needles you are going to use with the yarn and all the stitches required.
- MATCH YOUR DECREASES: If you follow a body on one sweater and sleeves from another, make sure your underarm BO sts and decreases are at the same rate and style for the sleeve and body of the sweater underarm.
- MAKE NOTES: If this is your style of knitting, printing out a working copy of all the patterns you are using for the one garment and making notes on what you modified, what parts you used, what you like, what you don’t like, the swatching gauge etc…will help, not only for this garment but for future garments.